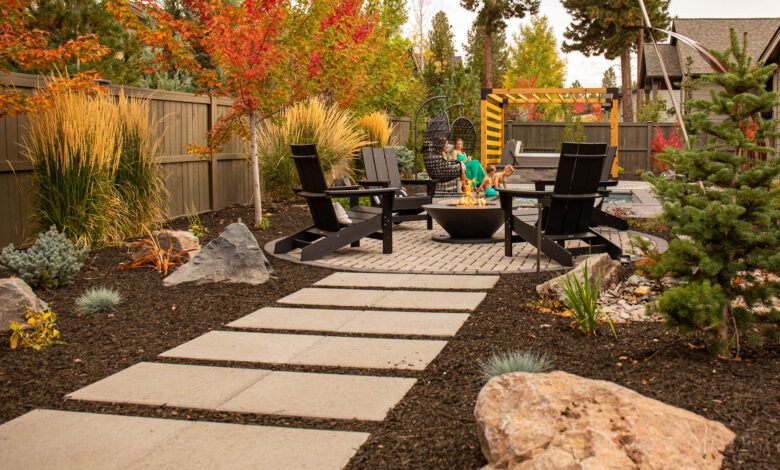
Stepping stones are more than just a practical solution for navigating your garden; they are a fundamental element of landscape design that can transform an ordinary yard into a magical journey. These versatile pieces offer a unique blend of function and artistry, creating pathways that guide the feet and delight the eyes. Whether you are aiming for a rustic, natural look or a modern, sleek aesthetic, stepping stones provide the perfect foundation. They invite exploration, protect your lawn from heavy foot traffic, and add structure to your green spaces.
This article guide will walk you through everything you need to know about choosing, installing, and maintaining the perfect stepping stones for your home, turning your garden into a connected and cohesive oasis.
Why Choose Stepping Stones for Your Landscape?
Stepping stones are an incredibly popular choice for homeowners and landscapers for a multitude of reasons. Their primary benefit is their ability to create a defined path that protects your grass and garden beds from becoming worn down. By providing a stable surface to walk on, they prevent soil compaction and keep your plants healthy. Beyond pure function, they are a powerful design tool. They can be used to break up large areas of mulch or lawn, adding visual interest and texture.
Stepping stones also offer a sense of discovery and whimsy, encouraging people to follow the path to see where it leads, perhaps to a hidden bench, a tranquil water feature, or a secluded reading nook. Furthermore, they are a relatively low-cost and DIY-friendly project that can significantly increase the curb appeal and overall value of your property.
A World of Options: Different Types of Stepping Stones
The variety of stepping stones available today is vast, allowing you to find the perfect match for your garden’s theme and your personal style. Your choice will influence the overall feel of your pathway, from casual and earthy to formal and elegant.
- Natural Stone: This category includes materials like slate, bluestone, sandstone, and limestone. Natural stone offers a timeless, organic beauty with unique colour variations and textures in every piece. It is incredibly durable and blends seamlessly with almost any garden environment. Each stone is one-of-a-kind, ensuring your path is truly unique.
- Concrete Pavers: Concrete stepping stones are a versatile and cost-effective option. Modern manufacturing techniques allow them to be moulded and coloured to mimic more expensive natural stones like cobblestone or granite. They are available in a huge array of shapes, sizes, and colours, offering great design flexibility. They are also known for their uniformity and strength.
- Cast Stone: Often made from reconstituted stone, cast stone products offer the look of natural stone with more consistency in shape and size. This can make installation easier while still providing a high-end, natural aesthetic. Brands often offer a range of finishes, from tumbled to smooth.
- Mosaic and Decorative Stones: For a truly personalised touch, mosaic stepping stones add a splash of colour and artistry. These can be handmade or purchased, featuring designs made from glass, tiles, or pebbles. They serve as functional pieces of art in the garden.
Planning Your Perfect Stepping Stone Pathway
A successful stepping stone project begins long before the first stone is laid. Careful planning ensures a functional, beautiful, and long-lasting result. Start by deciding on the purpose of your path. Is it a main thoroughfare from the driveway to the front door, requiring a more direct and sturdy setup? Or is it a meandering secondary path through a flower bed, where a more informal spacing works best? Use a garden hose or a bag of flour to mark out the proposed route on the ground.
This allows you to visualise the curve and flow and make adjustments before any digging begins. Next, consider the spacing between stones. A good rule of thumb is to place them so the average person can walk comfortably from one to the next with a natural gait, typically about one step apart. Finally, ensure your plan considers drainage, avoiding areas where water tends to pool.
A Step-by-Step Guide to Installation
Installing stepping stones is a manageable DIY project that can be completed over a weekend. Following the correct steps is crucial for creating a stable, level, and weed-resistant pathway.
- Step 1: Gather Your Tools and Materials
You will need your chosen stepping stones, a spade, a shovel, a rubber mallet, a spirit level, a tape measure, and bedding material. The bedding material is typically coarse sand or a fine gravel, which provides a stable base that also allows for drainage. For a more permanent installation in high-traffic areas, you may also need a base layer of crushed rock. Having all your tools ready before you start will make the process smooth and efficient. - Step 2: Mark and Dig the Layout
Following the layout you planned, place each stepping stone on the ground along your marked path. Then, using a spade, carefully trace around each stone. Once all the outlines are marked, remove the stones and set them aside. Now, dig out the traced areas to a depth that will accommodate the stone plus about 2-3 inches for your bedding sand. The goal is for the top of the stone to sit flush with or just slightly above the surrounding turf to prevent tripping and allow for lawn mowing. - Step 3: Prepare the Base and Bedding Layer
For a simple lawn installation, the sand bedding alone is often sufficient. Pour a layer of coarse sand into each hole to a depth of about 2 inches. Use your hand or a trowel to spread it evenly. The sand layer is critical as it allows you to fine-tune the level of each stone and provides a solid, non-shifting foundation. Tamp the sand down lightly to compact it. If your soil is soft or has poor drainage, or if the path will bear heavy use, consider adding a base layer of compacted crushed rock before the sand. - Step 4: Set and Level the Stones
This is the most important step for a professional-looking finish. Carefully place each stone into its prepared hole. Use a rubber mallet to gently tap the stone down into the sand. Frequently check the stone with a spirit level, ensuring it is even in all directions. Also, check that it is level with the stones around it to create a smooth walking surface. Add or remove sand from underneath as needed to achieve perfect levelling. A well-leveled stone will not rock underfoot and is much safer.
Creative Design Ideas for Your Garden
Stepping stones are not just for straight lines. Unleash your creativity to make your path a focal point. Consider creating a curved path that winds gracefully through your garden, adding a sense of mystery and length. For a modern look, use large, geometric concrete pavers in a repeating pattern. In a cottage garden, irregular natural stones surrounded by low-growing creeping thyme or moss look enchanting.
You can also use stepping stones to create a stable dry creek bed, a landing area for a bench, or even a whimsical “hopscotch” path for children. Mixing and matching different sizes of the same stone can also add dynamic visual interest.
Maintaining Your Stepping Stone Path
A little maintenance will keep your stepping stone path looking beautiful and safe for years to come. Over time, dirt, moss, and algae can build up on the surface, making them slippery. Regularly sweep the stones with a stiff brush to remove debris. For a deeper clean, a pressure washer can be very effective on concrete and natural stone, but use a low setting to avoid damaging the surface or washing away the sand joints. Weeds may occasionally sprout between the stones.
These can be easily pulled by hand or treated with a natural weed killer like vinegar. Replenish the sand between the stones if it gets washed away, as this helps lock them in place and suppresses weed growth.
Conclusion
Stepping stones are a quintessential landscaping feature that masterfully combines practical utility with immense aesthetic potential. They provide a durable and defined walking surface that protects your lawn and garden beds from wear and tear while guiding visitors through your outdoor space.
The wide range of available materials, from elegant natural stone to versatile concrete pavers, ensures there is a perfect style to complement any garden theme, from traditional to contemporary. A successful installation hinges on careful planning, precise levelling, and proper base preparation, which together guarantee a safe, stable, and long-lasting pathway.